You don’t need Yoast. You don’t need Rank Math. And you definitely don’t need another plugin slowing your site down to prove it.
Most “do SEO without a plugin” guides stop at “just add your keyword to the title.” That’s not SEO; that’s a placeholder. This guide gives you the actual code, the exact file locations, and the verification steps to do wordpress seo without plugin properly, from meta tags to XML sitemaps to structured data.
One caveat upfront: this requires touching functions.php and occasionally .htaccess. If that sounds scary, it shouldn’t, but always back up your site before editing theme files.
What “WordPress SEO Without Plugin” Actually Means
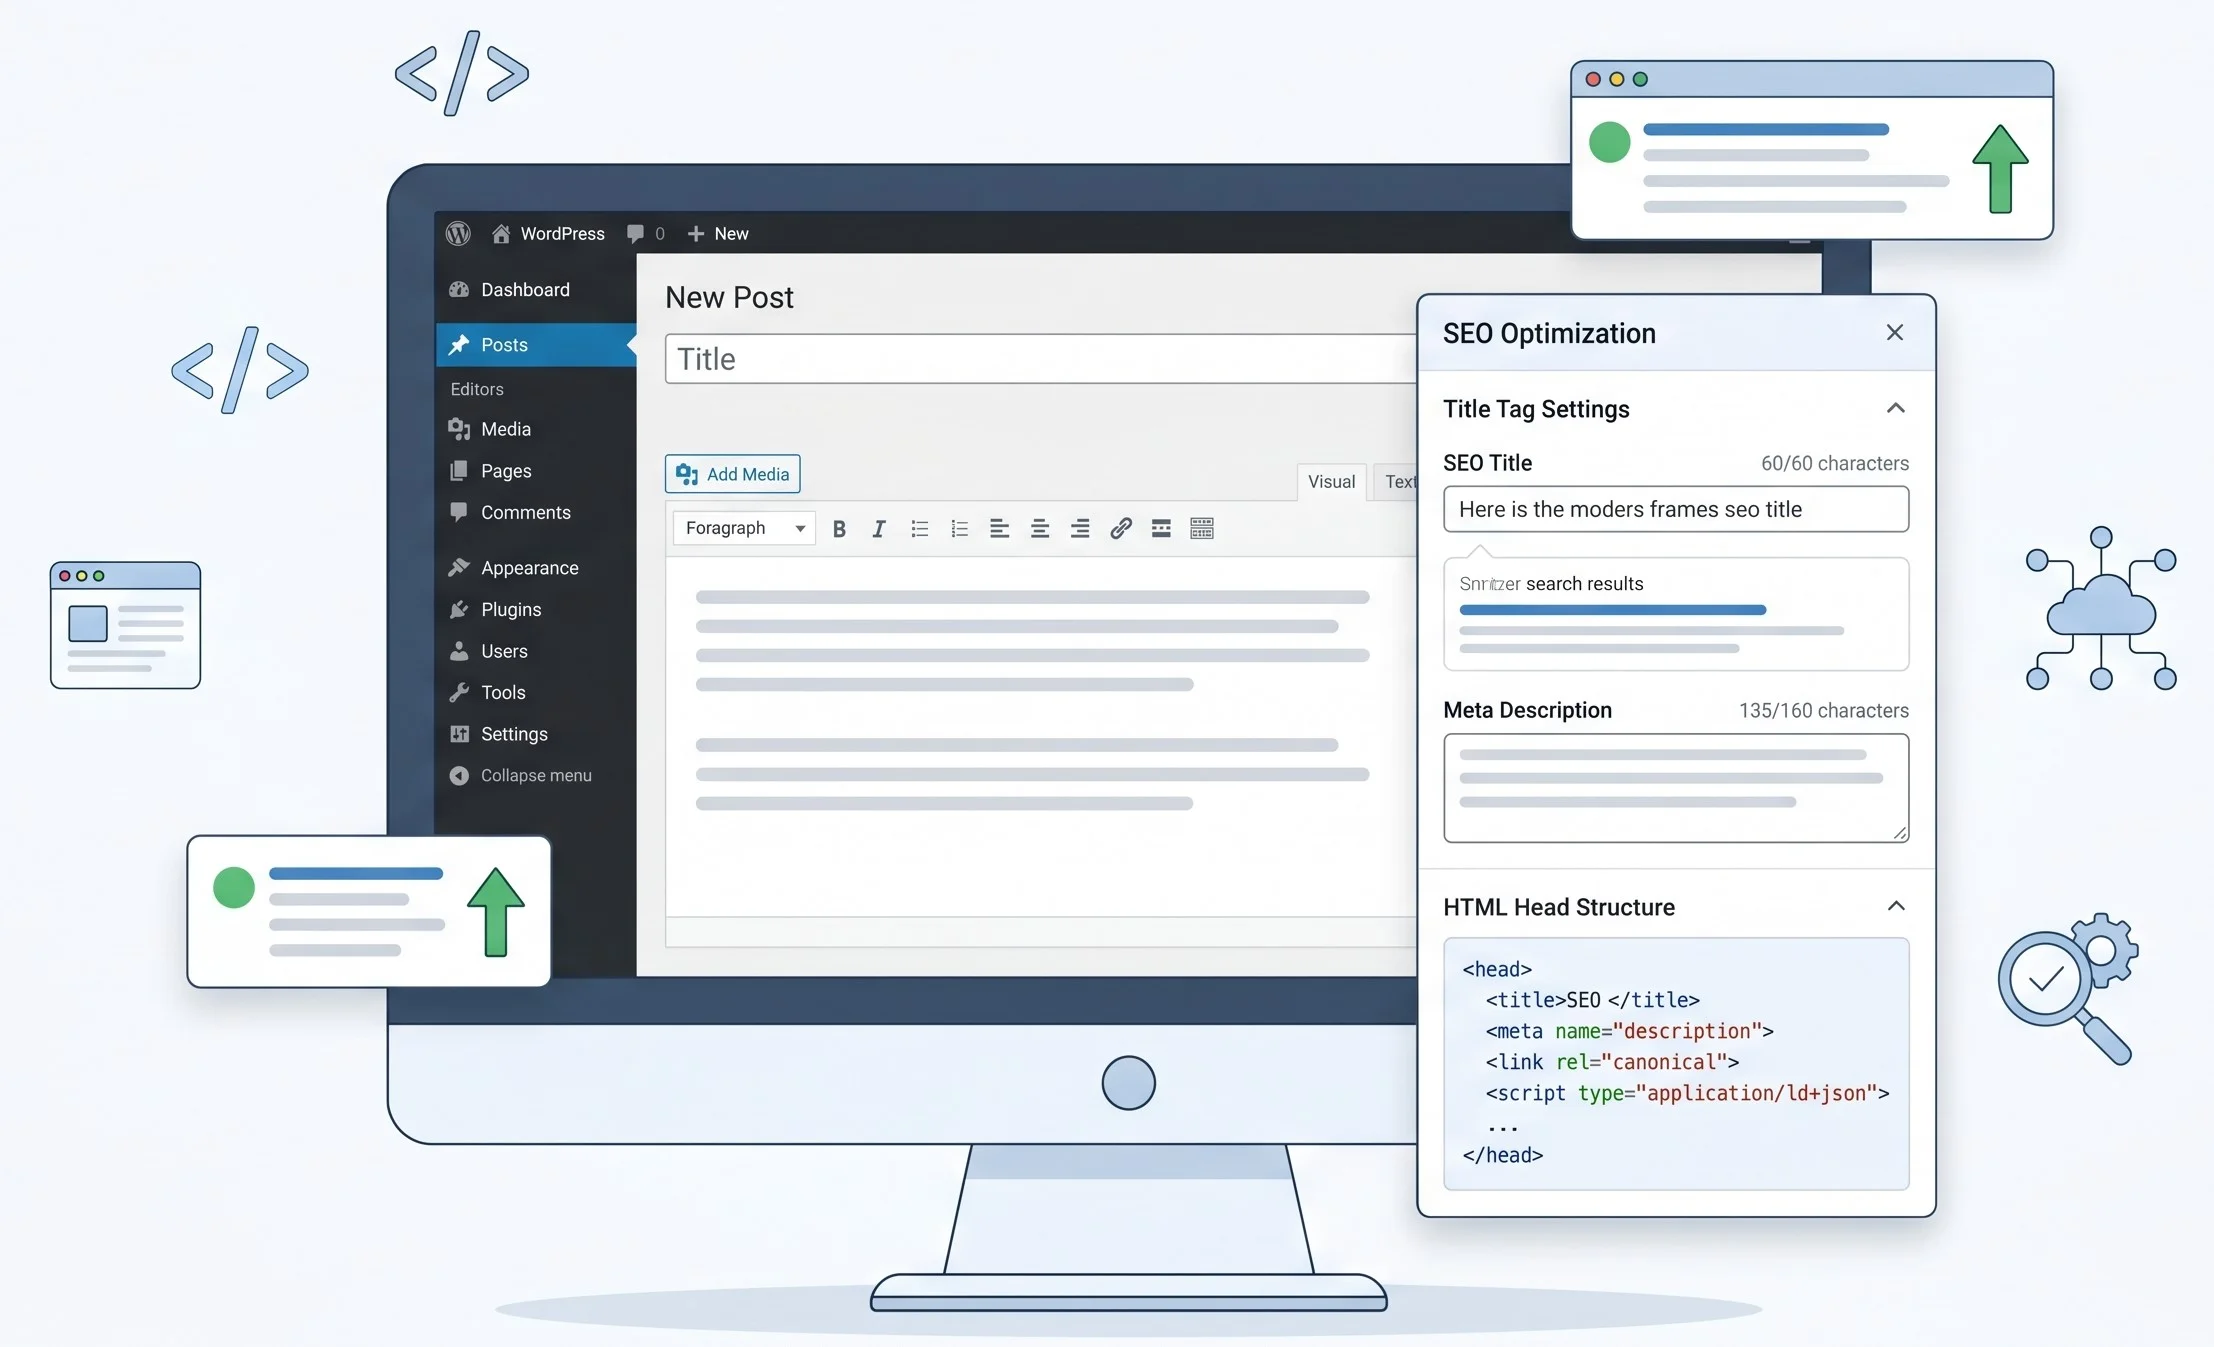
WordPress SEO without plugin means manually controlling your site’s title tags, meta descriptions, Open Graph data, XML sitemap, and structured markup, using WordPress’s native functions and your theme’s code files instead of delegating everything to a third-party plugin.
WordPress already handles a surprising amount of SEO out of the box. Since version 5.5, it generates a basic XML sitemap at yoursite.com/wp-sitemap.xml automatically. Since version 6.1, the block editor outputs clean, semantic HTML that search engines read well. The gap between “default WordPress” and “fully SEO-optimized WordPress” is smaller than most plugin marketing would have you believe.
That said, the gap is real. Meta descriptions, Open Graph tags, canonical URLs, and custom schema markup all need manual implementation if you’re going plugin-free.
Why Developers Choose Manual WordPress SEO (And When It Makes Sense)
Here’s the thing: this isn’t the right path for everyone, and being upfront about that matters.
Manual SEO makes sense when:
- Your site already has 15+ active plugins, and PageSpeed Insights is flagging render-blocking scripts
- You’re a developer building client sites and want full control over output
- Your theme is custom-built, and a plugin’s generated markup conflicts with your existing
<head>structure - You genuinely want to understand what’s happening in the background, not just click toggles
It’s harder when:
- You manage a large editorial team that needs a red/green content score to follow guidelines
- You’re running WooCommerce with hundreds of product pages needing automated schema
If you’re also making broader strategy errors, see our breakdown of common SEO mistakes that silently kill rankings.
Some experts argue that the performance cost of SEO plugins like Yoast or Rank Math is negligible on good hosting, and that’s valid for many scenarios. But users running shared hosting on entry-level SiteGround or Bluehost plans consistently report 200–400ms improvements in Time to First Byte after removing bloated plugin stacks. That’s not nothing.
Quick Comparison
| Option | Best For | Key Benefit | Limitation |
|---|---|---|---|
| Manual SEO (no plugin) | Developers, lean sites | Full control, zero overhead | Requires code knowledge |
| Rank Math Free | Beginners to intermediate | Guided setup, schema builder | Adds scripts to every page |
| Yoast SEO Free | Editorial teams | Content analysis UI | Heavier footprint, upsells |
| Yoast SEO Premium | Large content operations | Redirect manager, AI suggestions | $99/year per site |
How to Add Meta Tags in WordPress Without a Plugin
This is where most guides go vague. They say “add meta tags manually” and then show you nothing. Here’s the actual implementation.
Adding a Custom Meta Description via functions.php
Open your theme’s functions.php file (Appearance → Theme File Editor → functions.php) or, better, a child theme’s functions.php. Add this:
function nexklicks_custom_meta_description() {
    if ( is_singular() ) {
        global $post;
        $excerpt = wp_strip_all_tags( get_the_excerpt( $post ) );
        $description = ( $excerpt ) ? $excerpt : get_bloginfo( 'description' );
        echo '<meta name="description" content="' . esc_attr( $description ) . '">' . "\n";
    } elseif ( is_home() || is_front_page() ) {
        echo '<meta name="description" content="' . esc_attr( get_bloginfo( 'description' ) ) . '">' . "\n";
    }
}
add_action( 'wp_head', 'nexklicks_custom_meta_description' );
What this does: On single posts and pages, it pulls the excerpt as the meta description. On your homepage, it uses your site tagline (Settings → General → Tagline). If you want per-page custom descriptions, you’ll need a custom meta box, covered below.
Quick note: Always write your post excerpts manually in the Excerpt field in the WordPress editor. Auto-generated excerpts often cut off mid-sentence and hurt your click-through rate.
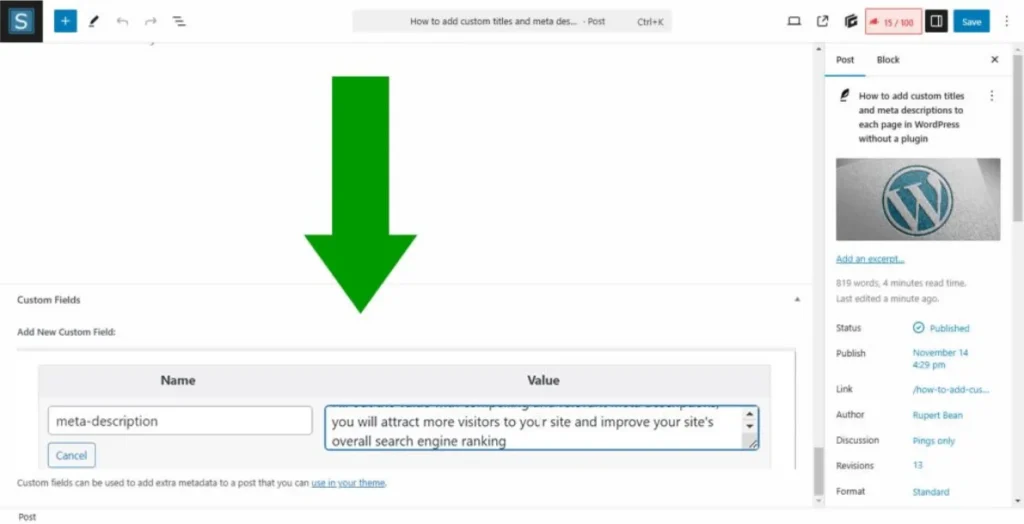
Adding a Custom Meta Box for Per-Page Descriptions
This lets you write a unique meta description for every post without any plugin:
// Register the meta box
function nexklicks_meta_description_box() {
    add_meta_box(
        'nexklicks_seo_meta',
        'SEO Meta Description',
        'nexklicks_meta_description_callback',
        array( 'post', 'page' ),
        'normal',
        'high'
    );
}
add_action( 'add_meta_boxes', 'nexklicks_meta_description_box' );

// Render the input field
function nexklicks_meta_description_callback( $post ) {
    wp_nonce_field( 'nexklicks_save_meta', 'nexklicks_meta_nonce' );
    $value = get_post_meta( $post->ID, '_nexklicks_meta_description', true );
    echo '<textarea name="nexklicks_meta_description" rows="3" style="width:100%">' . esc_textarea( $value ) . '</textarea>';
    echo '<p>Recommended: 148–158 characters. Current: <span id="meta-char-count">0</span></p>';
}

// Save the value
function nexklicks_save_meta_description( $post_id ) {
    if ( ! isset( $_POST['nexklicks_meta_nonce'] ) ) return;
    if ( ! wp_verify_nonce( $_POST['nexklicks_meta_nonce'], 'nexklicks_save_meta' ) ) return;
    if ( defined( 'DOING_AUTOSAVE' ) && DOING_AUTOSAVE ) return;
    if ( isset( $_POST['nexklicks_meta_description'] ) ) {
        update_post_meta( $post_id, '_nexklicks_meta_description', sanitize_textarea_field( $_POST['nexklicks_meta_description'] ) );
    }
}
add_action( 'save_post', 'nexklicks_save_meta_description' );

// Output in wp_head — update the earlier function to check this first
function nexklicks_custom_meta_description() {
    if ( is_singular() ) {
        global $post;
        $custom = get_post_meta( $post->ID, '_nexklicks_meta_description', true );
        $description = $custom ? $custom : wp_strip_all_tags( get_the_excerpt( $post ) );
        if ( $description ) {
            echo '<meta name="description" content="' . esc_attr( $description ) . '">' . "\n";
        }
    } elseif ( is_home() || is_front_page() ) {
        echo '<meta name="description" content="' . esc_attr( get_bloginfo( 'description' ) ) . '">' . "\n";
    }
}
add_action( 'wp_head', 'nexklicks_custom_meta_description' );
That changes everything. You now have a native per-post SEO description field, no plugin required.
Adding Open Graph Tags Without a Plugin
Open Graph tags control how your content looks when shared on Facebook, LinkedIn, and other platforms. Most plugin-free guides skip this entirely.
Add this to functions.php:
function nexklicks_open_graph_tags() {
    if ( ! is_singular() ) return;
    global $post;

    $title       = get_the_title( $post );
    $url         = get_permalink( $post );
    $description = get_post_meta( $post->ID, '_nexklicks_meta_description', true );
    if ( ! $description ) {
        $description = wp_strip_all_tags( get_the_excerpt( $post ) );
    }
    $image = '';
    if ( has_post_thumbnail( $post ) ) {
        $image = get_the_post_thumbnail_url( $post, 'large' );
    }

    echo '<meta property="og:type" content="article">' . "\n";
    echo '<meta property="og:title" content="' . esc_attr( $title ) . '">' . "\n";
    echo '<meta property="og:url" content="' . esc_url( $url ) . '">' . "\n";
    echo '<meta property="og:description" content="' . esc_attr( $description ) . '">' . "\n";
    if ( $image ) {
        echo '<meta property="og:image" content="' . esc_url( $image ) . '">' . "\n";
    }
    echo '<meta name="twitter:card" content="summary_large_image">' . "\n";
    echo '<meta name="twitter:title" content="' . esc_attr( $title ) . '">' . "\n";
    echo '<meta name="twitter:description" content="' . esc_attr( $description ) . '">' . "\n";
}
add_action( 'wp_head', 'nexklicks_open_graph_tags' );
The wp_head action hook fires inside your <head> tag on every page load — it’s the correct, officially documented injection point for metadata. See the wp_head hook reference on WordPress Developer Docs.
Title Tag Optimization for WordPress SEO Without Plugin
Title tags are the single highest-impact on-page SEO element, and WordPress 4.1+ already handles them correctly if your theme declares add_theme_support( 'title-tag' ).
Checking if Your Theme Supports title-tag
In your browser, right-click your site → View Page Source → search for <title>. If you see one, the theme is outputting it. If your theme has wp_title() in header.php instead, it’s using a deprecated method from pre-2015 and should be updated.
To enable the modern title tag system in a custom theme, add this to functions.php:
add_theme_support( 'title-tag' );
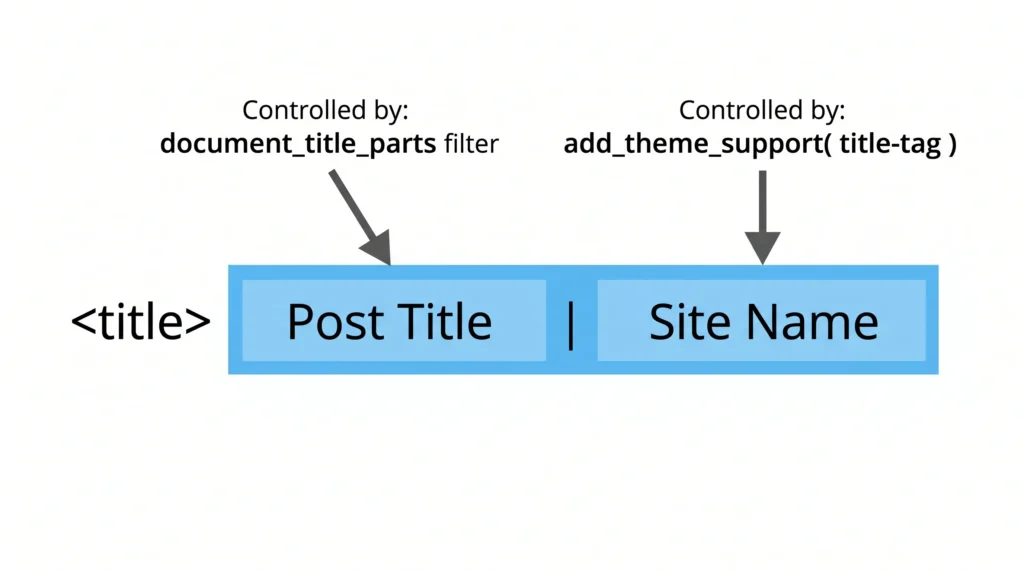
Customizing Title Tag Format for WordPress SEO Without Plugin
By default, WordPress outputs: Post Title – Site Name. To change the separator or order, use the pre_get_document_title filter:
function nexklicks_custom_title_separator( $title ) {
    return str_replace( ' – ', ' | ', $title );
}
add_filter( 'pre_get_document_title', 'nexklicks_custom_title_separator' );
Or, for full control over the title format on different page types:
function nexklicks_document_title_parts( $title ) {
    if ( is_front_page() ) {
        $title['tagline'] = ''; // Remove tagline from homepage title
    }
    return $title;
}
add_filter( 'document_title_parts', 'nexklicks_document_title_parts' );
I’ve seen conflicting data on title tag length; some SEO tools cap at 60 characters, others at 70, and Google’s own documentation doesn’t specify a hard limit since they rewrite titles dynamically anyway. My read: write for humans at 55–65 characters and let Google do what it wants with the rest. Optimizing too hard for an exact pixel width that changes per device isn’t worth the obsession.
XML Sitemap and Canonical URLs: What WordPress Already Gives You
Since WordPress 5.5 (released August 2020), a basic XML sitemap is generated automatically at yoursite.com/wp-sitemap.xml. This includes posts, pages, categories, tags, and authors by default.
To verify it exists: visit yoursite.com/wp-sitemap.xml in your browser. You’ll see an index sitemap linking to sub-sitemaps by content type.
Submitting Your Sitemap to Google Search Console
To submit to Google Search Console without any plugin:
- Log in to Google Search Console
- Select your property
- Go to Sitemaps in the left sidebar
- Enter
wp-sitemap.xmlin the field and click Submit
That’s it. WordPress handles generation, Google handles crawling, you handle nothing else.
Customizing the Built-In WordPress Sitemap
Want to exclude certain post types (like attachment pages, which have near-zero SEO value)? Add this to functions.php:
function nexklicks_remove_sitemap_post_types( $post_types ) {
    unset( $post_types['attachment'] );
    return $post_types;
}
add_filter( 'wp_sitemaps_post_types', 'nexklicks_remove_sitemap_post_types' );

// Remove authors from sitemap if a single-author site
function nexklicks_disable_sitemap_users( $provider, $name ) {
    if ( 'users' === $name ) {
        return false;
    }
    return $provider;
}
add_filter( 'wp_sitemaps_add_provider', 'nexklicks_disable_sitemap_users', 10, 2 );
Canonical URLs — Already Handled
WordPress outputs a canonical URL tag automatically on all singular content via the rel_canonical() function, which fires on wp_head. You don’t need to do anything here. This is one of those cases where WordPress’s defaults are genuinely correct.
How to Add Schema Markup in WordPress Manually
Schema markup (structured data) tells Google exactly what type of content a page contains: article, FAQ, product, recipe, etc. Plugins handle this with toggles. Without a plugin, you add it directly.
Adding Article Schema Without a Plugin
Add this to functions.php to inject JSON-LD Article schema on all single posts:
function nexklicks_article_schema() {
    if ( ! is_single() ) return;
    global $post;

    $schema = array(
        '@context'      => 'https://schema.org',
        '@type'         => 'Article',
        'headline'      => get_the_title( $post ),
        'datePublished' => get_the_date( 'c', $post ),
        'dateModified'  => get_the_modified_date( 'c', $post ),
        'author'        => array(
            '@type' => 'Person',
            'name'  => get_the_author_meta( 'display_name', $post->post_author ),
        ),
        'publisher'     => array(
            '@type' => 'Organization',
            'name'  => get_bloginfo( 'name' ),
            'logo'  => array(
                '@type' => 'ImageObject',
                'url'   => get_site_icon_url(),
            ),
        ),
        'url'           => get_permalink( $post ),
    );

    if ( has_post_thumbnail( $post ) ) {
        $schema['image'] = get_the_post_thumbnail_url( $post, 'full' );
    }

    echo '<script type="application/ld+json">' . wp_json_encode( $schema, JSON_UNESCAPED_SLASHES | JSON_UNESCAPED_UNICODE ) . '</script>' . "\n";
}
add_action( 'wp_head', 'nexklicks_article_schema' );
After adding the schema code, paste your post URL into Google’s Rich Results Test to confirm it’s correctly structured and eligible to appear as a rich result in search.
Or maybe I should say it this way: structured data without a plugin sounds intimidating, but it’s just a PHP array that WordPress encodes as JSON and drops into your <head>. The schema itself is what matters, not how it got there.
What Most Guides Skip: Verifying Your Manual SEO Changes Actually Work
Look, if you’ve just pasted code into functions.php and refreshed your post, here’s what actually works for verification:
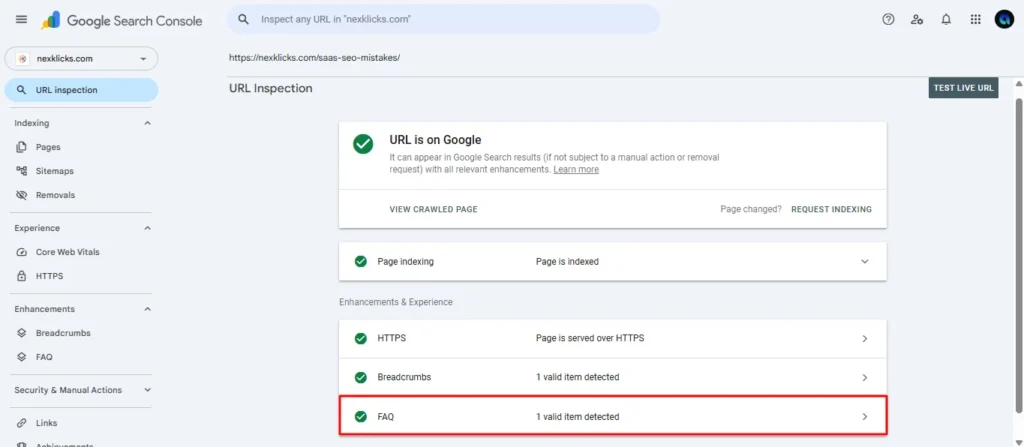
Step 1: In Google Search Console, go to URL Inspection → paste your post URL → click Inspect URL.
Step 2: Under the “Page Indexing” section, click Test Live URL. This shows Google what it actually sees, including your meta description and schema right now, not from a cached crawl.
Step 3: Scroll to “Detected Enhancements.” If your Article schema is registered correctly, it’ll appear here. If not, Google Search Console will tell you specifically why.
Once your impressions start climbing, you may notice a data discrepancy worth understanding why your Search Console clicks don’t match Google Analytics sessions.
This step is what separates a working implementation from an assumption. Neither competitor article we analyzed mentioned URL Inspection for verification, and that’s the step where most beginners discover their code is outputting in the footer instead of <head>, or that a caching plugin is serving stale HTML.
On-Page SEO Basics That Don’t Need Any Plugin at All
The WordPress block editor (Gutenberg) already handles several on-page SEO elements correctly, no plugin required and no code changes needed.
What WordPress handles natively:
- H1 tag: The post title is automatically wrapped in
<h1>. Never add a second H1 manually in your content. - Image alt text: Add it in the block editor’s image block sidebar. WordPress passes it through to the
<img alt="">attribute cleanly. Alt text is only half the equation; how image file names affect your search rankings is the other part most people skip. - Internal links: Add them using the standard link tool in the editor. WordPress outputs clean anchor tags.
- Permalink slugs: Edit the URL slug in the editor sidebar before publishing. Keep it short, 3 to 5 words maximum, no stop words.
What you handle in content:
- Use your target keyword in the first 100 words of the post body, naturally
- Use one H2 that includes a variation of your keyword
- Keep paragraphs short, aim for 3 sentences maximum on mobile
- Write descriptive anchor text for internal links (not “click here”)
Anyway, the honest truth about on-page SEO is that it’s 80% content quality and 20% technical signals. A plugin doesn’t change what you write; it just color-codes it.
5 Common Questions About Doing SEO in WordPress Without a Plugin
Q: What’s the best way to do WordPress SEO without plugin tools like Yoast or Rank Math?
A: Add meta descriptions and Open Graph tags via functions.php, use WordPress’s built-in sitemap at wp-sitemap.xml, inject JSON-LD schema manually and verify everything in Google Search Console’s URL Inspection tool.
Q: How do I add keywords in WordPress without a plugin?
A: WordPress doesn’t use a meta keywords tag. Google has ignored it since 2009. Focus on using your target keyword naturally in your title, first paragraph, one H2, and image alt text. That’s what actually affects rankings.
Q: Should I use Rank Math Free instead of going fully manual?
A: Rank Math Free is a reasonable middle ground. It’s lighter than Yoast, has a clean interface, and its free tier covers most needs. If you’re managing a site solo and don’t want to touch code, Rank Math Free is worth considering; just know it adds ~3–5 database queries per page load.
Q: Why does my WordPress site rank poorly even after manual SEO setup?
A: Manual SEO implementation is only part of the equation. Page speed (Core Web Vitals), quality backlinks, content depth, and topical authority all matter more than whether you used a plugin or not. Use Google Search Console’s Core Web Vitals report to check your CWV scores.
Q: When should I go back to using an SEO plugin?
A: When you’re managing more than 50 posts and need bulk redirect management, automated sitemap updates for WooCommerce products, or a content team that needs structured guidance. Manual SEO scales well for lean sites, but it gets painful fast on large editorial operations.
Final Thought
Doing wordpress seo without plugin is entirely viable, and for lean, fast sites, it’s genuinely the better approach. The code in this guide covers the 90% case: title tags, meta descriptions, Open Graph tags, XML sitemaps, schema markup, and verification.
The one mistake to avoid: adding this code to your parent theme’s functions.php directly. When that theme updates, your changes disappear. Always use a child theme, or better a site-specific plugin (a simple PHP file in wp-content/plugins/ with a plugin header comment) that holds all your custom functions.
Your next action: open Google Search Console, run URL Inspection on your homepage, and see what Google currently detects. That baseline tells you exactly what’s missing before you write a single line of code.
This guide covers self-hosted WordPress (WordPress.org) sites running WordPress 6.x. It does NOT address WordPress.com hosted plans, multisite networks, or headless WordPress setups.
Last updated: June 2026
Leave a Reply